Wednesday, January 29, 2020

How to setup Google Cloud Compute Engine for Spring Boot project?

You should have the Google account to for this. You will get $300 credit for 12 months for Google Cloud computing. In this article there are 2 parts. 1st will will tell you the billing part information and 2nd it will explain how to setup the project. So let's follow some steps to achieve this goal.

PART 1 : Setup Billing Information

Step 1: Search Google Cloud in Google or directly go to https://cloud.google.com/ . You need to setup the Cloud Platform. Click on Continue.
How to setup Google Cloud Compute Engine for Spring Boot project?

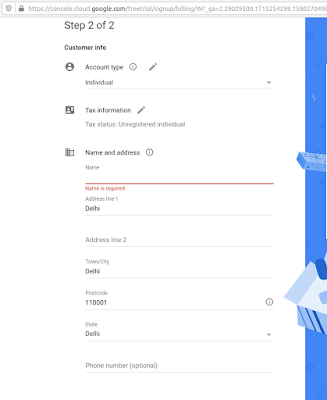
Step 2: Fill the required form.
javaaltaf How to setup Google Cloud Compute Engine for Spring Boot project?

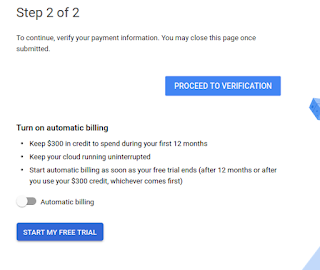
It will also ask for the payment details.
card details google cloud compute engine
Here Payment method is required. You need to give your debit/credit card details. You need to pay 1 Rupee to the GOOGLE CLOUD INDIA. Now click on START MY FREE TRIAL. After completion this you will get this info.
transaction completion compute engine

Step 3: Next step is to verify the your payment details. Whether you are the payment owner or not.
payment verification google cloud compute engine
For verification, they will ask your first/last name and need to upload one government id proof and debit/credit photo. It might take some hours for verification. After verifying you will get information like this.
payment verification completion google cloud compute engine
After completing the verification, you will get free access for 1 year. Now you can perform the required task for google cloud computing.


PART 2: Setup the execution environment

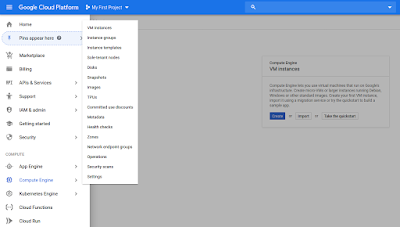
Step 1: Open Google Cloud Console and go to Compute Engine -> VM Instances

google cloud compute engine vm instance


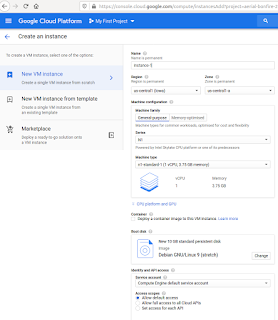
Now Create an instance and configure your machine. Based on your Machine Type, they will charge you money. Here you can configure your Operating System, Hard Disk size etc.
machine setup google cloud compute engine

After creating VM Instance, your machine will be visible with ip address.
machine info google cloud compute engine
Step 2: Connect your machine by clicking on SSH or by clicking drop down menu Open in browser window. It will open in new window. You will see the black screen with username & machine name. This is your machine terminal. Any operation if you want perform, you can do only with this terminal.
google cloud compute engine terminal

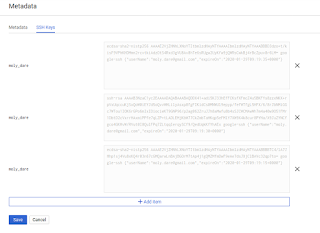
You can open this terminal from your local terminal/command prompt but before you need to set your public ssh key into metadata of Google Cloud. To set this open Compute Engine -> Metadata
google cloud compute engine metadata
To generate ssh key, open your local terminal and type
ssh-keygen -t rsa -b 4096 -C "your_email@example.com" 
It will ask Enter file in which to save the key:. You can type the file name on which you want to save. If you want default file name(id_rsa) then just press Enter.
Again it will ask Enter passphrase (empty for no passphrase):. You can use password or if you don't want then just hit Enter 2 times. File will be saved into /home/username/.ssh/filename.pub. Go to the Home location and press Ctrl+H to see the hidden files. .ssh directory will be hidden. Go to inside the ssh directory and open the file id_rsa.pub with any of your favorite editor and copy the complete text and paste into Metadata SSH Keys. Click on Edit
google cloud compute engine metadata ssh keys
then Click on Add Item
google cloud compute engine metadata ssh keys
Now here paste your copied ssh key then Save
google cloud compute engine metadata ssh key add item
Finally, open your local terminal and connect with your host machine ip address. 
ssh username@34.93.xxx.xxx
First time it will ask yes/no question. press yes and hit Enter. Congrats! you have connected. Now you need to install the required software like Java, Git, Maven  etc.
Install Java : sudo apt-get install openjdk-8-jdk
Git : sudo apt-get install git
Maven : sudo apt install maven
Curl : sudo apt install curl
Nano(Editor) : sudo apt-get install nano
Now you will have to install PM2 which is a process manager for the JavaScript runtime Node.js. I know you have a question What is the need of Node in Java environment? You have good question which will be answered below.

Step 3: Clone an Spring Boot project from your Github repository. If you don't have you can clone from my Github repository. Now execute your project. But how? You can execute by using maven command.
mvn spring-boot:run
Great, you have deployed your Spring Boot application into Google Cloud Compute Engine but what will happen if you close your terminal? :) :) :)
Oh no! my application stopped working.

Yes, this is the problem. You can solve this problem by executing the command in background.
setsid mvn spring-boot:run
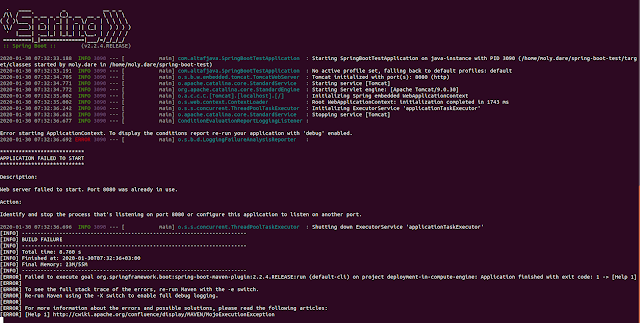
Now even you close the terminal, your application will work but what will happen if you need to restart the server? You will get this error
Web server failed to start. Port 8080 was already in use.
mvn spring-boot:run termnal gcp compute engine
You can solve this problem as well. What you need to do is
A. First of all, you need to find the pid(process id) of the running application based on the port.
lsof -i:8080
You will get output as
lsof -i:8080
2965 is your processId.

B. Then you need to kill the process by using this command.
kill -9 2965
C. And again you need to start the server by using setsid command.

Now you can think how this is painful. Hence to resolve this issue you can use PM2.
curl -sL https://deb.nodesource.com/setup_10.x -o nodesource_setup.sh
sudo bash nodesource_setup.sh
sudo apt-get install nodejs
sudo npm install -g pm2

Step 4: I think you have already cloned the project from Github. Then go to the project directory by using cd command
git clone https://github.com/altafjava/spring-boot-test.git
cd spring-boot-test/
You will have to create one .sh file which will be used by the PM2 to restart the server. In your .sh file you need to write the command which is used to execute the spring boot project that is nothing but mvn spring-boot:run
echo "mvn spring-boot:run">server.sh
chmod +x server.sh
Finally, restart the server
pm2 start server.sh
You can even check the logs on runtime by using
pm2 logs

If you have come so far, then I think you have done great job. Congrats!
Still you have any doubt feel free to comment.

Tuesday, January 28, 2020

How to deploy Spring Boot app in Google Cloud Compute Engine with embedded tomcat?

Now a days deploying Spring Boot application is quite easy in Cloud Platform. A lot of articles already have published on the web but unfortunately I have not seen a single article written in this topic. Hence I planned to write a blog in this topic. You will get a lot of article on deployment of Spring Boot application in Google Cloud App Engine but not on Compute Engine. Hence be ready for Compute Engine.

How to deploy Spring Boot app in Google Cloud Compute Engine with embedded tomcat?


First Let's understand the difference between App Engine & Compute Engine.
App Engine is a Platform-as-a-Service. It means that you simply deploy your code, and the platform does everything else for you. For example, if your app becomes very successful, App Engine will automatically create more instances to handle the increased volume.

Compute Engine is an Infrastructure-as-a-Service. You have to create and configure your own virtual machine instances. It gives you more flexibility and generally costs much less than App Engine. The drawback is that you have to manage your app and virtual machines yourself.

I will recommend to use Ubuntu operating system if you are using Compute Engine and install the required software like Java, Git, Maven etc. You can visit here to know How to setup Google Cloud Compute Engine for Spring Boot project?  Let's come to our main topic.


Open the server terminal by going to Compute Engine -> VM Instances -> SSH or you can open from local terminal as well if you have configured your ssh key in your machine. To open/connect locally use this command.
ssh username@34.93.xxx.xxx
First time it will ask yes/no question. press yes and hit Enter. Congrats! you have connected. Now you need to install the required software like Java, Git, Maven  etc.
Install Java : sudo apt-get install openjdk-8-jdk
Git : sudo apt-get install git
Maven : sudo apt install maven
Curl : sudo apt install curl
Nano(Editor) : sudo apt-get install nano
Now you will have to install PM2 which is a process manager for the JavaScript runtime Node.js. I know you have a question What is the need of Node in Java environment? You have good question which will be answered below.

Clone an Spring Boot project from your Github repository. If you don't have you can clone from my Github repository. Now execute your project. But how? You can execute by using maven command.
mvn spring-boot:run
Great, you have deployed your Spring Boot application into Google Cloud Compute Engine but what will happen if you close your terminal? :) :) :)
Oh no! my application stopped working.

Yes, this is the problem. You can solve this problem by executing the command in background.
setsid mvn spring-boot:run
Now even you close the terminal, your application will work but what will happen if you need to restart the server? You will get this error
Web server failed to start. Port 8080 was already in use.
mvn spring-boot:run termnal gcp compute engine
You can solve this problem as well. What you need to do is
1. First of all, you need to find the pid(process id) of the running application based on the port.
lsof -i:8080
You will get output as
lsof -i:8080
2965 is your processId.

2. Then you need to kill the process by using this command.
kill -9 2965
3. And again you need to start the server by using setsid command.

Now you can think how this is painful. Hence to resolve this issue you can use PM2.
curl -sL https://deb.nodesource.com/setup_10.x -o nodesource_setup.sh
sudo bash nodesource_setup.sh
sudo apt-get install nodejs
sudo npm install -g pm2
I think you have already cloned the project from Github. Then go to the project directory by using cd command
git clone https://github.com/altafjava/spring-boot-test.git
cd spring-boot-test/
You will have to create one .sh file which will be used by the PM2 to restart the server. In your .sh file you need to write the command which is used to execute the spring boot project that is nothing but mvn spring-boot:run
echo "mvn spring-boot:run">server.sh
chmod +x server.sh
Finally, restart the server
pm2 start server.sh
You can even check the logs on runtime by using
pm2 logs

If you have come so far, then I think you have done great job. Congrats!
Still you have any doubt feel free to comment.

Sunday, January 26, 2020

[Solved] no tests found with test runner junit 5

We often get this error in Eclipse/STS while working with JUnit. As we know JUnit has released JUnit5 after successor of JUnit4. When we create Spring Boot starter project whose version is higher than 2.1.4.RELEASE then by default Spring adds the JUnit5 dependencies.

no tests found with test runner junit 5

It can have multiple solutions but as of now I am explaining one of the solution here. So you have to follow some steps. In a simple way this blog will tell you to use JUnit4 instead of Junit5 but later I will update for JUnit5 as well.


Step 1:
If you are using Spring Boot then by default Spring adds spring-boot-starter-test dependency like this.
<dependency>
 <groupId>org.springframework.boot</groupId>
 <artifactId>spring-boot-starter-test</artifactId>
 <scope>test</scope>
 <exclusions>
  <exclusion>
   <groupId>org.junit.vintage</groupId>
   <artifactId>junit-vintage-engine</artifactId>
  </exclusion>
 </exclusions>
</dependency>
Here you need to remove or make comment the <exclusions>. Now if you will check in the Maven Dependency you will get JUnit4.
<dependency>
 <groupId>org.springframework.boot</groupId>
 <artifactId>spring-boot-starter-test</artifactId>
 <scope>test</scope>
</dependency>

Step 2:
Goto the the package src/test/java and open one of the JUnit test class. You need to change then @Test annotation import from import org.junit.jupiter.api.Test; to import org.junit.Test;


Step 3:
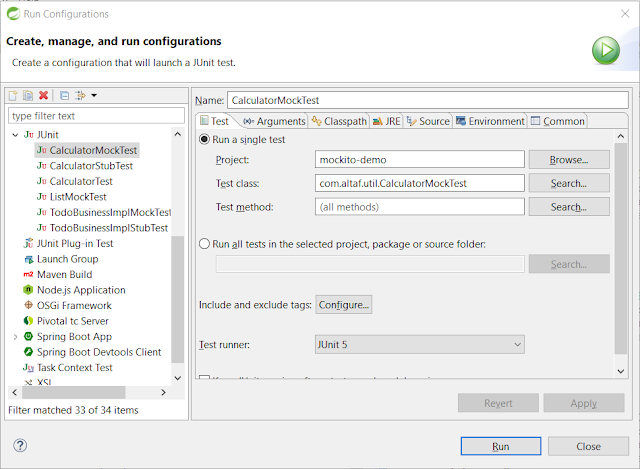
Now open your one of the JUnit test class then right click. Then goto Run As -> Run Configurations. Now Inside the Test tab, there is an option Test runner. Change it to JUnit5 to JUnit4 then click on Run.

Run Configurations

Congrats! Now it will run your JUnit test. Feel free to comment or give feedback if required any modification.

Wednesday, January 22, 2020

How to install free ssl certificate in spring boot using Let's Encrypt


As we know ssl provides the extra layer of security. Every packet transferred between client and server is encrypted using public or private key cryptography. Now a days everyone ensuring to protect their web application through ssl certificate. If you have developed your web application by using Spring then you are at right place. Here you will learn how to install ssl certificate without paying anything.

How to use install free genuine ssl certificate in spring boot application using let's encrypt


There are multiple ways to generate ssl certificates. Even Java also has provided a tool(keytool). If you will use keytool then you can enable https but still you will see Not Secure in the browser URL like this.

Not Secure


Hence we are here to make this as secure with green color https URL. To make this green https, we will use Let's Encrypt. Let's Encrypt is a non-profit certificate authority run by Internet Security Research Group that provides X.509 certificates for Transport Layer Security encryption at no charge. So Let's follow the steps.

Step 1:
Stop the application or server running on the port 80 or 443. You can check whether any application or server running or not on a particular port by using lsof command.
lsof -i :8080

To stop the application or server, you can use kill command.
kill -9 pid

Step 2:
You need to install the certbot on your server. You can open the server terminal by using ssh command.
ssh alt@xxx.xxx.xxx.xxx
where xxx is your server ip address. Now use this command to install certbot if you have Ubuntu operating system.
sudo apt-get update -y && sudo apt-get upgrade -y
sudo apt-get install software-properties-common
sudo add-apt-repository ppa:certbot/certbot
sudo apt-get update
sudo apt-get install python-certbot-apache

Step 3:
Now generate the ssl certificate by using the following command.
certbot certonly -a standalone -d api.example.com
where api.example.com is your domain name. This will generate the 4 .pem files inside etc/letsencrypt/live/api.example.com-0001/.
To goto this directory, use this command.
cd /
cd etc/letsencrypt/live/api.example.com-0001/
To see the files in the current directory use the ls command.
ls
This will show the following files list.
cert.pem  chain.pem  fullchain.pem  privkey.pem  README

Step 4:
As we know Spring supports .p12 file for ssl certification. Hence we need to convert the .pem files into .p12 file. To generate PKCS12 file from PEM files we shall have to use openssl command.
openssl pkcs12 -export -in fullchain.pem -inkey privkey.pem -out api_example_com.p12 -name myalias -CAfile chain.pem -caname root
Hint:
-out will the converted file name
-name will be your alias name

This will ask to enter password. After entering the password, again it will ask the password. You will have to enter the password 2 times.

Step 5:
Finally, it will generate the api_example_com.p12 file in the current directory. Now you need to copy this file in Spring Boot Maven project resource directory(src/main/resources/). To copy the file from server location to local machine, you can scp command but I will recommend to first copy the file to your ubuntu home location because there may be a lot of users present that OS.
cp api_example_com.p12 /home/myusername/
exit
exit
Now you are in local machine terminal. From here you need to copy the file from server machine home location to your local machine.
scp alt@xxx.xxx.xxx.xxx:api_example_com.p12 .
Hint: Here . means current directory. You can change it your appropriate directory. This will be downloaded into your home directory.

Step 6:
Now copy this(api_example_com.p12) file and paste in src/main/resources of your Spring Boot project. Now do some changes in your application.properties file
server.ssl.enabled=true
server.ssl.key-store=classpath:api_example_com.p12
server.ssl.key-store-password=mypassword
server.ssl.keyStoreType=PKCS12
server.ssl.keyAlias=myalias
http.port=80
server.port=443

Step 7:
Here you need to take special care. After saving this configuration in your application.properties file, if you start the server locally, it will fail to start. Because the .p12 has mapped to your ip xxx.xxx.xxx.xxx and your current ip is 127.0.0.1 that is localhost. Hence only this will start on your server. To avoid this happening, you can use profile concept of Spring. Hence you need to create another property file ie application-prod.properties then cut and paste those ssl configuration in application-prod.properties file and remove from application.properties file.
You need to write one more line in application.properties file
spring.profiles.active=prod
Now if you want to start the server locally then comment this and start.
#spring.profiles.active=prod
It will start locally without ssl but when you want to start the server on server machine then you need to uncomment this config.

Step 8:
This is an optional step but I will recommend to do. In this step you need to write a config class
that will redirect every request that is coming via http to https.
import org.apache.catalina.Context;
import org.apache.catalina.connector.Connector;
import org.apache.tomcat.util.descriptor.web.SecurityCollection;
import org.apache.tomcat.util.descriptor.web.SecurityConstraint;
import org.springframework.beans.factory.annotation.Value;
import org.springframework.boot.context.embedded.ConfigurableEmbeddedServletContainer;
import org.springframework.boot.context.embedded.EmbeddedServletContainerCustomizer;
import org.springframework.boot.context.embedded.EmbeddedServletContainerFactory;
import org.springframework.boot.context.embedded.tomcat.TomcatEmbeddedServletContainerFactory;
import org.springframework.context.annotation.Bean;
import org.springframework.context.annotation.Configuration;
import org.springframework.context.annotation.Profile;
@Profile("prod")
@Configuration
public class TomcatConfig {

@Value("${http.port}")
private int httpPort;

@Bean
public EmbeddedServletContainerFactory servletContainer() {
 TomcatEmbeddedServletContainerFactory tomcat = new TomcatEmbeddedServletContainerFactory() {
  @Override
  protected void postProcessContext(Context context) {
   SecurityConstraint securityConstraint = new SecurityConstraint();
   securityConstraint.setUserConstraint("CONFIDENTIAL");
   SecurityCollection collection = new SecurityCollection();
   collection.addPattern("/*");
   securityConstraint.addCollection(collection);
   context.addConstraint(securityConstraint);
  }
 };
 tomcat.addAdditionalTomcatConnectors(initiateHttpConnector());
 return tomcat;
}

 private Connector initiateHttpConnector() {
  Connector connector = new Connector("org.apache.coyote.http11.Http11NioProtocol");
  connector.setScheme("http");
  connector.setPort(httpPort);
  connector.setSecure(false);
  connector.setRedirectPort(8443);
  return connector;
 }
}

Congrats! You are done. Feel free to comment, if you have any doubt.