Saturday, August 29, 2020

How to Log RestTemplate Request Response without destroying body

When we are working with REST services, it can be very useful for debugging to be able to log both the request and the response info. We can do this very easy just by adding an interceptor in our project.

import java.io.BufferedReader;
import java.io.IOException;
import java.io.InputStreamReader;
import org.springframework.http.HttpRequest;
import org.springframework.http.client.ClientHttpRequestExecution;
import org.springframework.http.client.ClientHttpRequestInterceptor;
import org.springframework.http.client.ClientHttpResponse;
import lombok.extern.log4j.Log4j2;

@Log4j2
public class LoggingRequestInterceptor implements ClientHttpRequestInterceptor {

	@Override
	public ClientHttpResponse intercept(final HttpRequest request, final byte[] body, final ClientHttpRequestExecution execution) throws IOException {
		traceRequest(request, body);
		ClientHttpResponse response = execution.execute(request, body);
		traceResponse(response);
		return response;
	}

	private void traceRequest(HttpRequest request, byte[] body) throws IOException {
		log.info("=========================== Request Begin ===========================");
		log.info("URI          : " + request.getURI());
		log.info("Method       : " + request.getMethod());
		log.info("Headers      : " + request.getHeaders());
		log.info("Body : " + new String(body, "utf-8"));
		log.info("============================ Request End ============================");
	}

	private void traceResponse(ClientHttpResponse response) throws IOException {
		StringBuilder inputStringBuilder = new StringBuilder();
		BufferedReader bufferedReader = new BufferedReader(new InputStreamReader(response.getBody(), "utf-8"));
		String line = bufferedReader.readLine();
		while (line != null) {
			inputStringBuilder.append(line);
			line = bufferedReader.readLine();
		}
		log.info("=========================== Response Begin ===========================");
		log.info("Status code   : {}", response.getStatusCode());
		log.info("Status text   : {}", response.getStatusText());
		log.info("Headers       : {}", response.getHeaders());
		log.info("Body          : {}", inputStringBuilder.toString());
		log.info("============================ Response End ============================");
	}

}

Now create a BeanConfig class to create RestTemplate object.

import java.util.Collections;
import org.springframework.context.annotation.Bean;
import org.springframework.context.annotation.Configuration;
import org.springframework.http.client.BufferingClientHttpRequestFactory;
import org.springframework.http.client.SimpleClientHttpRequestFactory;
import org.springframework.web.client.RestTemplate;
import com.altafjava.misc.LoggingRequestInterceptor;

@Configuration
public class BeanConfig {

	@Bean
	public RestTemplate buildrestTemplate() {
		RestTemplate restTemplate = new RestTemplate(new BufferingClientHttpRequestFactory(new SimpleClientHttpRequestFactory()));
		restTemplate.setInterceptors(Collections.singletonList(new LoggingRequestInterceptor()));
		return restTemplate;
	}
}

That's it! But you will run in a problem.

How to Log RestTemplate Request Response without destroying body


Actually Response body is a stream and if we read it in the interceptor it won’t be available for RestTemplate to deserialize it into object model. In other words, when we call restTemplate.get..() we will always get back empty objects (even as we see the object in the response. Fortunately we can fix that by using org.springframework.http.client.BufferingClientHttpResponseWrapper class.

BufferingClientHttpResponseWrapper

But unfortunately, you cannot use this class because this class is not public. Hence we cannot create object of this class. Hence to solve this we need to manually create this class with public modifier. Hence to solve this finally lets follow some steps.


Step 1 :-

First we should create a BufferingClientHttpResponseWrapper class which will copy the response from actual response. Now with this copied response we can use response.getBody() any time.
import java.io.ByteArrayInputStream;
import java.io.IOException;
import java.io.InputStream;
import org.springframework.http.HttpHeaders;
import org.springframework.http.HttpStatus;
import org.springframework.http.client.ClientHttpResponse;
import org.springframework.util.StreamUtils;

public class BufferingClientHttpResponseWrapper implements ClientHttpResponse {

	private final ClientHttpResponse response;
	private byte[] body;

	public BufferingClientHttpResponseWrapper(ClientHttpResponse response) {
		this.response = response;
	}

	@Override
	public InputStream getBody() throws IOException {
		if (body == null) {
			body = StreamUtils.copyToByteArray(response.getBody());
		}
		return new ByteArrayInputStream(body);
	}

	@Override
	public HttpStatus getStatusCode() throws IOException {
		return this.response.getStatusCode();
	}

	@Override
	public int getRawStatusCode() throws IOException {
		return this.response.getRawStatusCode();
	}

	@Override
	public String getStatusText() throws IOException {
		return this.response.getStatusText();
	}

	@Override
	public HttpHeaders getHeaders() {
		return this.response.getHeaders();
	}

	@Override
	public void close() {
		this.response.close();
	}
}


Step 2 :-

Create a custom interceptor class ie LoggingRequestInterceptor which will implement ClientHttpRequestInterceptor class. This class will be responsible to print all the RestTemplate request & response logs.
import java.io.BufferedReader;
import java.io.IOException;
import java.io.InputStreamReader;
import org.springframework.http.HttpRequest;
import org.springframework.http.client.ClientHttpRequestExecution;
import org.springframework.http.client.ClientHttpRequestInterceptor;
import org.springframework.http.client.ClientHttpResponse;
import lombok.extern.log4j.Log4j2;

@Log4j2
public class LoggingRequestInterceptor implements ClientHttpRequestInterceptor {

	@Override
	public ClientHttpResponse intercept(final HttpRequest request, final byte[] body, final ClientHttpRequestExecution execution) throws IOException {
		traceRequest(request, body);
		ClientHttpResponse response = execution.execute(request, body);
		response = traceResponse(response);
		return response;
	}

	private void traceRequest(HttpRequest request, byte[] body) throws IOException {
		log.info("=========================== Request Begin ===========================");
		log.info("URI          : " + request.getURI());
		log.info("Method       : " + request.getMethod());
		log.info("Headers      : " + request.getHeaders());
		log.info("Body : " + new String(body, "utf-8"));
		log.info("============================ Request End ============================");
	}

	private ClientHttpResponse traceResponse(ClientHttpResponse response) throws IOException {
		ClientHttpResponse newCopiedResponse = new BufferingClientHttpResponseWrapper(response);
		StringBuilder inputStringBuilder = new StringBuilder();
		BufferedReader bufferedReader = new BufferedReader(new InputStreamReader(newCopiedResponse.getBody(), "UTF-8"));
		String line = bufferedReader.readLine();
		while (line != null) {
			inputStringBuilder.append(line);
			line = bufferedReader.readLine();
		}
		log.info("=========================== Response Begin ===========================");
		log.info("Status code   : {}", response.getStatusCode());
		log.info("Status text   : {}", response.getStatusText());
		log.info("Headers       : {}", response.getHeaders());
		log.info("Response Body : {}", inputStringBuilder.toString());
		log.info("============================ Response End ============================");
		return newCopiedResponse;
	}
}

Step 3 :-

Create a Bean configuration class which will create RestTemplate object.
import java.util.Collections;
import org.springframework.context.annotation.Bean;
import org.springframework.context.annotation.Configuration;
import org.springframework.http.client.BufferingClientHttpRequestFactory;
import org.springframework.http.client.SimpleClientHttpRequestFactory;
import org.springframework.web.client.RestTemplate;
import com.altafjava.misc.LoggingRequestInterceptor;

@Configuration
public class BeanConfig {

	@Bean
	public RestTemplate buildrestTemplate() {
		RestTemplate restTemplate = new RestTemplate(new BufferingClientHttpRequestFactory(new SimpleClientHttpRequestFactory()));
		restTemplate.setInterceptors(Collections.singletonList(new LoggingRequestInterceptor()));
		return restTemplate;
	}
}

Thats It!
Happy Coding.

For your reference you can the project in https://github.com/altafjava/log-resttemplate-req-resp

Thursday, August 13, 2020

java.lang.AssertionError: UnsupportedOperationException: Cannot define class using reflection

Problem:

If you are using EqualsVerifier for JUnit tesing purpose then there may be a chance you can get this error.

java.lang.AssertionError: UnsupportedOperationException: Cannot define class using reflection

equalsverifier


Solution:

To overcome this error we just have to use the upper version of equalsverifier dependency. Till the version 2.4.7 we will get this error. Hence we can use the equalsverifier 2.4.8 or higher than 2.4.8.

Example:-

<dependency>
    <groupId>nl.jqno.equalsverifier</groupId>
    <artifactId>equalsverifier</artifactId>
    <version>2.4.8</version>
    <scope>test</scope>
</dependency>

Thats it!

Happy Coding.

java.io.FileNotFoundException while using classLoader.getResource(fileName) method

Problem: 

I have a method loadFileFromClassPath(String fileName). Inside the method I am taking help of ClassLoader to get the File object and returning it.

    public static File loadFileFromClassPath(String fileName) {
        File file;
        ClassLoader classLoader = Thread.currentThread().getContextClassLoader();
        file = new File(classLoader.getResource(fileName).getFile());
        return file;
    }

There is an another method method fileDataToString(String fileName) which is using loadFileFromClassPath(String fileName) method.
    public static String fileDataToString(String fileName) throws IOException {
        final StringBuilder sb = new StringBuilder();
        final InputStream is = loadFileFromClassPath(fileName);
        String line;
        try(BufferedReader br = new BufferedReader(new InputStreamReader(is))) {
        	while ((line = br.readLine()) != null) {
        		sb.append(line);
        	}
	}
        return sb.toString();
    }


But here classLoader.getResource(fileName) method is not working and causing java.io.FileNotFoundException.


FileNotFoundException


Solution:

To solve this problem you can use classLoader.getResourceAsStream(fileName) which returns InputStream.
    public static InputStream loadFileFromClassPath(String fileName) {
        ClassLoader loader = Thread.currentThread().getContextClassLoader();
        InputStream is=loader.getResourceAsStream(fileName);
        return is;
    }

And you just need to change some logic to read the data from InputStream to String in fileDataToString(String fileName) method as
    public static String fileDataToString(String fileName) throws IOException {
        final StringBuilder sb = new StringBuilder();
        final InputStream is = loadFileFromClassPath(fileName);
        String line;
        try(BufferedReader br = new BufferedReader(new InputStreamReader(is))) {
        	while ((line = br.readLine()) != null) {
        		sb.append(line);
        	}
	}
        return sb.toString();
    }

Thats it!
Happy Coding.


The forked VM terminated without properly saying goodbye. VM crash or System.exit called

 At the time of `mvn clean install` if you are getting this error.


you just have add a plugin in your pom.xml file.

<plugin>
  <groupId>org.apache.maven.plugins</groupId>
  <artifactId>maven-surefire-plugin</artifactId>
  <configuration>
    <forkCount>3</forkCount>
    <reuseForks>true</reuseForks>
    <argLine>-Xmx1024m -XX:MaxPermSize=256m</argLine>
  </configuration>
</plugin>


Thats All!
Happy Coding.


Caused by: java.lang.ClassNotFoundException: com.sun.tools.javac.code.TypeTags when using lombok

  At the time of `mvn clean install` if you are getting this error then it that means you are at the right place.

com.sun.tools.javac.code.TypeTags


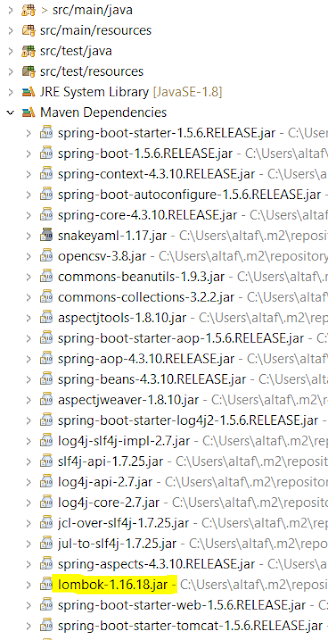
And this error is coming means you are using Lombok dependency in your project. See the Maven dependency in your project and check the Lombok version.


lombok-version


To solve this error you need to use lombok version higher that 1.16.20. Means at least minimum version you can use 1.16.22 or higher than it.

Example:-

<dependency>
<groupId>org.projectlombok</groupId>
<artifactId>lombok</artifactId>
<version>1.16.22</version>
<optional>true</optional>
</dependency>

Fatal error compiling: java.lang.ExceptionInInitializerError: com.sun.tools.javac.code.TypeTags

 At the time of `mvn clean install` if you are getting this error then it that means you are at the right place.

com.sun.tools.javac.code.TypeTags


And this error is coming means you are using Lombok dependency in your project. See the Maven dependency in your project and check the Lombok version.


lombok-version


To solve this error you need to use lombok version higher that lombok-1.16.20. Means at least minimum version you can use lombok-1.16.22 or higher than it.


Saturday, February 8, 2020

How to setup complete security status in AWS?

Sign in to the AWS Management Console and open the IAM console at https://console.aws.amazon.com/iam/. You will see your Identity & Access Management(IAM).

html {overflow-x: hidden;}]]>
Here security status has 5 step to complete. 1st one is already completed. Now need to complete the remaining steps.
Now click on Activate MFA on your account. then click on Manage MFA. Then click on Multi-factor authentication (MFA) and click on Activate MFA.
After that you will see

Select Virtual MFA device and click on continue if you have an smartphone(Android/IOS etc). Remaining two(U2F security key & Other hardware MFA device) can be used if you have any MFA hardware device.


You nee to install among these apps Authy, Duo Mobile, LastPass Authenticator, Microsoft Authenticator, Google Authenticator. Scan the QR code. You will get two security code. Fill these in the respective box. If you are using Google Authenticator, it will generate random six digit codes. Put the the 2 codes in the respective textbox.
Note: If have enable MFA then it is mandatory to have the Authenticator app in your mobile, otherwise you will lose your AWS account or need to verify your account using email and mobile no. When you have enabled MFA then for every login it will ask MFA code along with valid email & password. Hence either don't enable MFA or if enabled then make sure to not delete the authenticator app and not lose the mobile because without your mobile, you cannot login to your AWS console if you have lost you mobile.

After that you will see.

If your 1st step Delete your access keys showing warning icon like this
then you need to Delete your root access keys item on the Security Status and click on Manage Security Credentials. A new page entitled Your Security Credentials will be displayed. Expand Access Keys (access key ID and secret access key) section. A list of your access key will be listed. Delete all of them using Delete link located on the right side, and confirm any dialogue box that may show up.

Now in your Dashboard, you will see 2 step completed.

Now goto 3rd step, Create Individual IAM users.
Click on Add user. You will see one form. Fill the required details and click on Next: Permissions.
Next you will see this
As I need the Administrator access, Hence I will choose Attach existing policies directly.
Then click on Next: Tags.
This is optional step. Hence I will leave as it is and click on Next: Review.
Finally, click on Create user.

Now the user successfully created. You can download the credentials.csv file to know the username, access key id, secret access key and console login link. Go to the Dashboard you will see 3 steps completed.

Now click on Use groups to assign permissions to create the group.

click on Create New Group
Set the group name as you want then click on Next Step.
Then attach the policy. I will give here Administrative access then click Next Step.
After review click on Create Group.

Click on the group name(admin) to see the summary and add users to the group.
You can select the user to add into the group.

After selecting then click on Add Users.

Now user is added into the group as you are seeing. User inherits the permissions from the Group. Hence if the permission is directly attached to the User, you can detach the permission. To detach the permission go to the Users in the left side of menu

Then click on the user name.
You can see the permission is directly attached. Click on the cross icon to detach the
permission. 
Click on Detach. Now go to the Dashboard. You will see

 Click on Apply an IAM password policy.

Click on Set Password Policy.
Then click on Save Changes. Finally, go to the Dashboard and you will see all the security
steps completed.
Thanks