First of all, there is a big question "Why we need to host/deploy our maven artifact of a project into Google Cloud Storage"?
Answer: If some classes are common across multiple projects then we can create a jar file of these classes and we can use in both the projects by adding this jar file into classpath location. But if we are following this approach we can face multiple problems.
For clear understanding, let's take an example.
In a company, suppose we have 2 projects. One is for main core project and another one is for CSR(Customer Service Representative). As we know for managing our core project we need Customer Service team. For this CSR team, we need to build an application so that they can handle the support management.
As we know nowadays sending OTP is mandatory for almost all the application for signup, login, etc. To send the OTP, we need SMS gateway. There are a lot of SMS gateway providers. You can find here and we are using one of them. Almost all they have provided an API to send the SMS through the program.
Now we have a requirement to send OTP in the main project and as well as we also require to send tracking and promotional SMS to our customers from CSR project. In this case, we need to write the program to send the SMS two times. Hence the same code will be duplicated. If there is a change in the SMS Gateway API we need to change in all the project wherever we are using that API. In this case, we can create a separate project for sending SMS and we can deploy this project into jfrog, nexus, archiva etc. Now wherever we require the SMS gateway just we need to add the GAV(groupId, artifactId, version) into our project and automatically the class which we have deployed into our remote repositories will be downloaded like other maven artifact and we don't need to manage the dependency. Everything will be taken care by maven.
Let's understand another example
In both the projects Main & CSR we are retrieving the data from Database. For this, we are using Hibernate(is an ORM Framework. Generally it converts the table data which is in RDBMS format to Java object format & vice-versa). To map the table into Java object and Java object to the table we have to write entity class. Name of the class will map to name of the table and no. of attributes of the class will map to no. of columns of the table. Hence if we want ORM support then we shall have to create same no. of attributes in the class as many columns are available in the table.
Now, we have a CUSTOMER table. For this table, we have created one Customer class. As we know we need the customer information in both the projects. Yes, we can duplicate the classes in both the projects but when if there is a change in the table structure we shall have to modify in all the project's entity classes. Not we can have only Customer class which is common. There can be a lot of classes which is common across multiple projects. In this case, modify class structure is a very tedious job.
Hence we can create the artifact for these common classes and deploy into remote repositories so that we can use in all the project without modifying the source code.
Now the thing is
Why we should use Google Cloud Storage rather than using jfrog, nexus, archiva?
Yes, of course, you can go with jfrog, nexus, archiva etc. But if you have hosted your application into Google Cloud Platform then obviously you will want to use other Google services. Now, in this case, we can go with Google Cloud Storage to host or deploy our artifact into GCS.
Now we shall see the complete process to deploy/host the maven artifact into GCS. This is in 2 parts. The first part is how to upload the artifact into the GCS bucket and second part is how to download and use the uploaded artifact from GCS bucket.
PART 1 :
Step 1 :
Create a maven quickstart project. You can create through the command prompt or by using IDE.
Now create a simple class for testing purpose. By the way, based on your requirement you can create multiple classes.
Step 3 :
You will have to add an extension inside <build> tag in your pom.xml provided by Emmanouil Gkatziouras.
Step 4 :
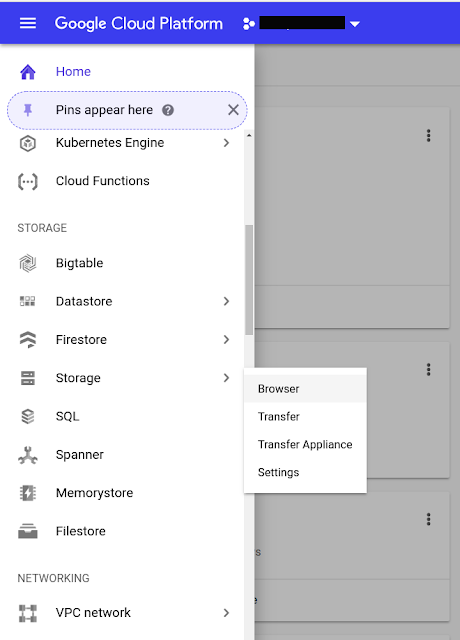
Open your Google Cloud Platform. Go to Menu->Storage->Browser.
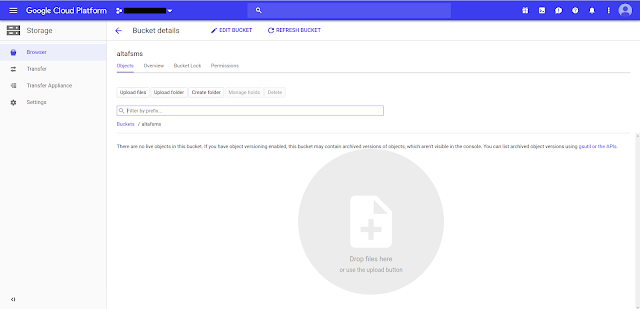
This will open one dashboard where you will have to create a bucket where your artifact will be stored.
Click on Create Bucket.
You can give any name to you bucket based on your requirement but the name must be unique across the cloud storage. Here I have given altafsms
After creating the bucket this will look like this
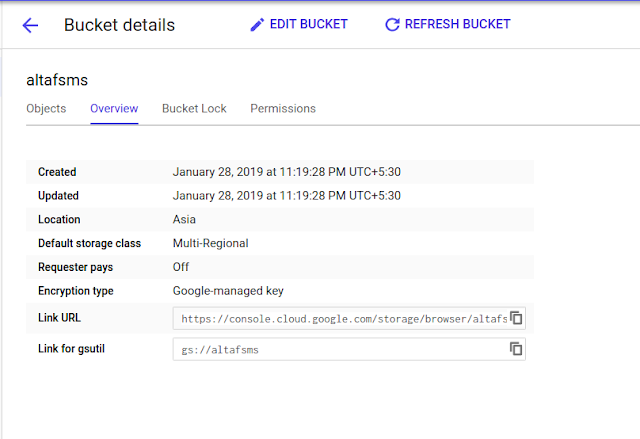
Goto overview section where you will see Link URL, Link for gsutil and other additional information of your bucket. We will use gsutil URL.
Step 5 :
Now we need to set up the bucket information into pom.xml so that maven can understand the destination of the artifact. For this we shall have to add <distributionManagement> tag just after the <project> tag.
Step 6 :
You should have Google Cloud SDK installed in your PC. If not then please install. You can get help from here. If it is already installed you can check by using this command (gcloud info) in terminal/command prompt.
After installing this goto your project directory and open the terminal/command prompt and log in with the account that has the access to the bucket which we have created previously through gcloud.
gcloud auth application-default login
This will redirect you in a browser to allow the access of google account. If it is not redirecting to the browser then copy and paste the URL which is shown in the terminal into the browser and then login with google account. After successfull login you will see a message like Credentials saved to file: [/home/alt/.config/gcloud/application_default_credentials.json]. Until you get this message deployment will not work. If you see this message then you are allowed to access the bucket information.
Step 7 :
Now go to your project directory and open command prompt or terminal and just type this command.
mvn deploy
This command will successfully upload your artifact into your GCS bucket. This should take more than 60 seconds. You can get a message either BUILD SUCCESS or BUILD FAILURE.
PART 2 :
In this section, we shall understand how to use the artifact which is already uploaded into Google Cloud Storage Bucket. So here also we shall follow some steps.
Step 1 :
To use the artifact, first of all, we shall have to create a maven project. It can also be a Spring Boot project.
Step 2 :
Now add the same <extension> into your pom.xml which you already added in the previous project.
<build>
Step 3 :
Now you can create a Test class to test the MessageSender class.
Answer: If some classes are common across multiple projects then we can create a jar file of these classes and we can use in both the projects by adding this jar file into classpath location. But if we are following this approach we can face multiple problems.
- As we are living in the world of Apache Corporation, everyone is using a maven build tool. No one wants to use the external library in their projects. If we are external libraries then managing the dependency is really painful.
- If there is a change in the common classes then again we will have to package these classes into jar file then set this jar file in all the projects.
For clear understanding, let's take an example.
In a company, suppose we have 2 projects. One is for main core project and another one is for CSR(Customer Service Representative). As we know for managing our core project we need Customer Service team. For this CSR team, we need to build an application so that they can handle the support management.
As we know nowadays sending OTP is mandatory for almost all the application for signup, login, etc. To send the OTP, we need SMS gateway. There are a lot of SMS gateway providers. You can find here and we are using one of them. Almost all they have provided an API to send the SMS through the program.
Now we have a requirement to send OTP in the main project and as well as we also require to send tracking and promotional SMS to our customers from CSR project. In this case, we need to write the program to send the SMS two times. Hence the same code will be duplicated. If there is a change in the SMS Gateway API we need to change in all the project wherever we are using that API. In this case, we can create a separate project for sending SMS and we can deploy this project into jfrog, nexus, archiva etc. Now wherever we require the SMS gateway just we need to add the GAV(groupId, artifactId, version) into our project and automatically the class which we have deployed into our remote repositories will be downloaded like other maven artifact and we don't need to manage the dependency. Everything will be taken care by maven.
Let's understand another example
In both the projects Main & CSR we are retrieving the data from Database. For this, we are using Hibernate(is an ORM Framework. Generally it converts the table data which is in RDBMS format to Java object format & vice-versa). To map the table into Java object and Java object to the table we have to write entity class. Name of the class will map to name of the table and no. of attributes of the class will map to no. of columns of the table. Hence if we want ORM support then we shall have to create same no. of attributes in the class as many columns are available in the table.
Now, we have a CUSTOMER table. For this table, we have created one Customer class. As we know we need the customer information in both the projects. Yes, we can duplicate the classes in both the projects but when if there is a change in the table structure we shall have to modify in all the project's entity classes. Not we can have only Customer class which is common. There can be a lot of classes which is common across multiple projects. In this case, modify class structure is a very tedious job.
Hence we can create the artifact for these common classes and deploy into remote repositories so that we can use in all the project without modifying the source code.
Now the thing is
Why we should use Google Cloud Storage rather than using jfrog, nexus, archiva?
Yes, of course, you can go with jfrog, nexus, archiva etc. But if you have hosted your application into Google Cloud Platform then obviously you will want to use other Google services. Now, in this case, we can go with Google Cloud Storage to host or deploy our artifact into GCS.
Now we shall see the complete process to deploy/host the maven artifact into GCS. This is in 2 parts. The first part is how to upload the artifact into the GCS bucket and second part is how to download and use the uploaded artifact from GCS bucket.
PART 1 :
Step 1 :
Create a maven quickstart project. You can create through the command prompt or by using IDE.
mvn archetype:generate -DgroupId=com.javaaltaf -DartifactId=SMSGateway -DarchetypeArtifactId=maven-archetype-quickstart -DinteractiveMode=falseStep 2 :
Now create a simple class for testing purpose. By the way, based on your requirement you can create multiple classes.
public class MessageSender {
 public String sendSMS(String mobile, String message) {
  return "SMS sending....to " + mobile + "  with messsage=" + message;
 }
}
You will have to add an extension inside <build> tag in your pom.xml provided by Emmanouil Gkatziouras.
<build>
  <extensions>
   <extension>
    <groupId>com.gkatzioura.maven.cloud</groupId>
    <artifactId>google-storage-wagon</artifactId>
    <version>1.6</version>
   </extension>
  </extensions>
</build>
You can download the latest google-storage-wagon from here. This will upload and download our artifact to/from Google Cloud Storage.Step 4 :
Open your Google Cloud Platform. Go to Menu->Storage->Browser.
This will open one dashboard where you will have to create a bucket where your artifact will be stored.
Click on Create Bucket.
You can give any name to you bucket based on your requirement but the name must be unique across the cloud storage. Here I have given altafsms
After creating the bucket this will look like this
Goto overview section where you will see Link URL, Link for gsutil and other additional information of your bucket. We will use gsutil URL.
Step 5 :
Now we need to set up the bucket information into pom.xml so that maven can understand the destination of the artifact. For this we shall have to add <distributionManagement> tag just after the <project> tag.
<distributionManagement>
  <snapshotRepository>
   <id>mysms-snapshot</id>
   <url>gs://altafsms/snapshot</url>
  </snapshotRepository>
  <repository>
   <id>mysms-release</id>
   <url>gs://altafsms/release</url>
  </repository>
 </distributionManagement>
Generally, a snapshot version in Maven is one that has not been released. The idea is that before a 1.0 release (or any other release) is done, there exists a 1.0-SNAPSHOT. Here <snapshotRepository> is same as snapshot version. and <respository> is released version. You can use either <snapshotRepository> or </repository> at a time. This will decide based on the version you have mentioned into your pom.xml file. If the version is SNAPSHOT then it will upload into gs://altafsms/snapshot. If it is released version then it will be uploaded into gs://altafsms/release. You can give any unique id but better to follow some convention or standard. In <url> tag you need to provide the gsutil URL which already we have created.
Step 6 :
You should have Google Cloud SDK installed in your PC. If not then please install. You can get help from here. If it is already installed you can check by using this command (gcloud info) in terminal/command prompt.
After installing this goto your project directory and open the terminal/command prompt and log in with the account that has the access to the bucket which we have created previously through gcloud.
gcloud auth application-default login
This will redirect you in a browser to allow the access of google account. If it is not redirecting to the browser then copy and paste the URL which is shown in the terminal into the browser and then login with google account. After successfull login you will see a message like Credentials saved to file: [/home/alt/.config/gcloud/application_default_credentials.json]. Until you get this message deployment will not work. If you see this message then you are allowed to access the bucket information.
Step 7 :
Now go to your project directory and open command prompt or terminal and just type this command.
mvn deploy
This command will successfully upload your artifact into your GCS bucket. This should take more than 60 seconds. You can get a message either BUILD SUCCESS or BUILD FAILURE.
PART 2 :
In this section, we shall understand how to use the artifact which is already uploaded into Google Cloud Storage Bucket. So here also we shall follow some steps.
Step 1 :
To use the artifact, first of all, we shall have to create a maven project. It can also be a Spring Boot project.
Step 2 :
Now add the same <extension> into your pom.xml which you already added in the previous project.
<build>
<build>
 <extensions>
  <extension>
   <groupId>com.gkatzioura.maven.cloud</groupId>
   <artifactId>google-storage-wagon</artifactId>
   <version>1.6</version>
  </extension>
 </extensions>
</build>
After that add the GAV(groupId, artifact id, version) of the earlier project as <dependency> tag in your pom.xml file.
<dependency>
  <groupId>com.javaaltaf</groupId>
  <artifactId>SMSGateway</artifactId>
  <version>1.0</version>
</dependency>
Note: If both the project is open in the IDE(Eclipse) then it will pick the complete project as Maven Dependencies. Hence to avoid this temporarily you can remove the earlier project or just change the artifactId so that maven could find the artifact from GCS Bucket.
Step 3 :
Now you can create a Test class to test the MessageSender class.
public class Test {
 public static void main(String[] args) {
  MessageSender messageSender = new MessageSender();
  String message = messageSender.sendSMS("9876543210", "Hello Altaf, How are you?");
  System.out.println("Returned Message = " + message);
 }
}
Output: Returned Message = SMS sending....to 9876543210 with messsage=Hello Altaf, How are you?
So, finally, we have deployed our artifact into Google Cloud Storage Bucket and used it. You can download both the projects from Github.
Project 1 : SMSGateway
Project 2 : TestSMSGateway
Hope you understood. If still any doubts you can comment here.
Project 1 : SMSGateway
Project 2 : TestSMSGateway
Hope you understood. If still any doubts you can comment here.


![[Solved] no tests found with test runner junit 5 [Solved] no tests found with test runner junit 5](https://blogger.googleusercontent.com/img/b/R29vZ2xl/AVvXsEgmRn0nKVu98X-upjhj-uU6b7JqPUu2YPa-i-G1HtW7hkTz_ux7FgpwGG-5BWYUaGkIIKgGTCa5IwADUNZeuJpGrQ4YI7FTn_iPTEadOcUREqqyeftghjpSG5TDlJC4bWrjMsg3s1e3Sf8/s72-c/no+tests+found+for.png)


